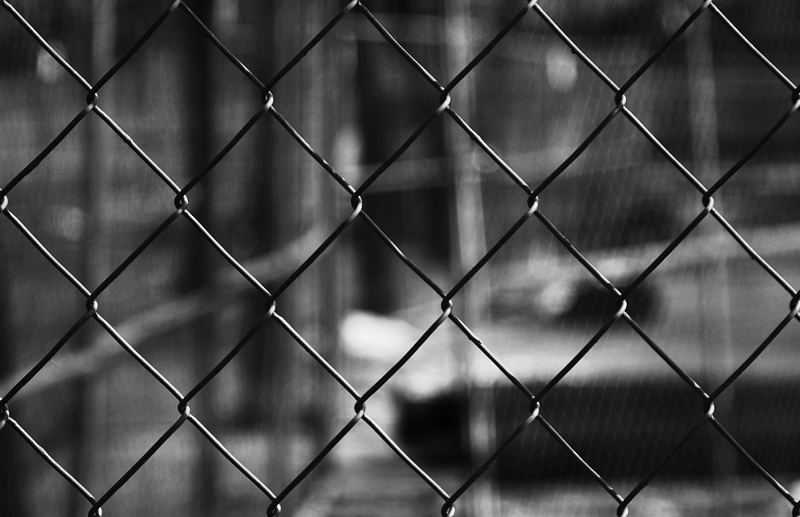
A chain-link fence is an inexpensive way to enclose any sized area for safety or security. Unlike solid fencing, chain link’s open weave design lets people see through the fence, while still serving as a barrier to unauthorized entry. Here are the steps to installing a chain-link fence.
1 – Before You Install
Obtain any necessary permits. Your local government may have building and zoning regulations that regulate fence setbacks, type, and height.
Establish where your property lines are located. This information can be obtained from city records, a realtor’s line plot map or by hiring a surveyor.
Call 7977558650 from anywhere in the Arihant Steel. Your local utility companies will then send an employee to mark your utility lines for free. You don’t want to accidentally hit them while digging post holes.
Review any neighborhood covenants for regulations on fencing. Some neighborhood associations have their own rules regarding height and style, additional to the rules enforced by your town.
2 – Mark Your Fence Layout
Locate the property lines that border your neighbor’s. For your post holes, measure approximately 4 inches (10.2 cm) inside those lines. This prevents the concrete footings from encroaching onto your neighbor’s property.
Measure the total length of your planned fence. This determines how many feet of chain-link mesh and the amount of hardware you’ll need. Consult your local retailer for post spacing guidelines to determine the number of posts you’ll need.
Find each terminal post location. Mark the exact spot with a stake or spray paint. A terminal post refers to any end, corner or gate posts.
3 – Install the Terminal Posts
Dig all the terminal post holes first. Post holes should be dug 3 times the width and one-third the length of the post, with an extra 4 inches (10.2 cm) for gravel. Slope the sides so that the hole is wider at the bottom than at the top.
Fill the post holes with 4 inches (10.2 cm) of gravel. Tamp down the gravel to provide a compact foundation for the posts and concrete.
Stand a terminal post in the center of its hole. Mark the side of the post at ground level using a marker or chalk. The height above the line should equal the height of the fence mesh, plus 2 inches (5.1 cm).
Plumb the post. Using a carpenter’s level or plumb line, position the post until it’s plumb.
Secure the post in position. Using clamps and pieces lumber angled into the ground, brace the post in its plumb position.
Fill the hole with concrete. Pour or shovel concrete around the post. Smooth the surface with a trowel or small piece of wood, sloping away from the post to direct water elsewhere.
Repeat until all your terminal posts are installed. Allow time for the concrete to set, according to manufacturer’s recommendations.
4 – Mark Your Line Posts
Run a string line between the terminal posts. The string should be taut, low to the ground, and positioned on the outside face of the terminal posts.
Mark the location of each line post. Using a post spacing chart, measure and mark the exact spot with a stake or spray paint.
5 – Install the Line Posts
Dig the line post holes. Line post holes should be 6 inches (15.2 cm) wide and 18 inches (45.7 cm) to 24 inches (61.0 cm) deep, with sloping sides.
Repeat the terminal post installation steps (above) for each line post.
6 – Add Bands and Caps to the Posts
Slide tension bands onto each post. Tension bands secure the chain-link mesh to the posts. Use one less tension band than the height of the fence, in feet. For example, if the fence is 4-feet high, use 3 tension bands per post. For a 6-foot fence, use 5 bands, and so on.
The long, flat surface of the tension band should face toward the outside of the fence.
Add the appropriate caps to posts. Terminal posts get end caps. Line posts get looped caps (for the top rail.)
Tighten all the nuts and bolts, but not too tight. Leave some slack for adjustments.
7 – Install the Top Rail
Feed the top rails through the loop caps. Cut off excess length with a pipe cutter or hacksaw. If the rails are too short, create longer runs by using rails with male-female coupling ends.
Insert the rail ends into the terminal rail caps. You may need to adjust the height of the rail caps to allow for the height of the chain-link mesh, plus a 2 inch (5.1 cm) clearance at the bottom.
Tighten nuts and bolts. After checking your top rails and caps for proper fit and alignment, tighten all the hardware.
Fill the line post holes with dirt, packing the dirt firmly around the holes.
8 – Hang the Fence Mesh
Slide a tension bar vertically through the starting end of the mesh roll. This will stiffen the mesh so that you can attach it to the fence posts and rails.
Bolt the tension bar to one of the terminal posts’ tension bands. The mesh should overlap the rail by 1 to 2 inches (2.5 to 5.1 cm) and be 2 inches (5.1 cm) off the ground.
You’ll need someone to help you stand the mesh up to the end post and a socket wrench to turn the bolt.
Begin unrolling the mesh. Stand it up against the fence frame, taking out the slack as you go.
Loosely attach the mesh to the top rail. Use fence ties to hold it in place. Separate enough length from the roll to span the opening between the terminal posts.
Splice sections together as needed. Using a single strand of wire removed from one end of the mesh, join two sections by corkscrewing the loose strand through the end links. A second strand may have to be removed to provide the correct line-up of “diamonds.”
Remove excess mesh. Using pliers, untwist the top and bottom loops on one strand of wire where you want to separate the mesh. Work the freed strand out of the links until the two sections separate.
9 – Stretching the Chainlink
Pull the mesh taut with a fence puller. The stretching is necessary so the fence doesn’t sag.
Thread the fence puller’s bar into an unattached section of mesh, a short distance from the far end post.
Attach the fence puller’s yoke to the pull bar and connect the other end of the puller to the far end post.
Stretch the mesh with the fence puller until the mesh loops move less than a quarter-inch when squeezed by hand.
If the mesh gets pulled out of shape during the tightening process, pull on it to reshape it.
Run a second tension bar through the end of the mesh near the fence puller.This will permit attaching the stretched mesh to the far end post’s tension bands.
Terminate the mesh with a tension bar on the far end post’s tension bands.
Remove any new excess produced by stretching.
10 – Tie and Tighten
Tie the mesh to the rails with aluminum wire. Space your ties 24 inches (61.0 cm) apart along the top rail and 12 inches (30.5 cm) apart on each line post.
Sources – Wikipedia
